How to Create a WordPress Booking Form in WordPress
A WordPress booking form can completely change the way you run your business. By automating your scheduling, you can capture more leads, reduce administrative back-and-forth, and provide a better experience for your customers.
Whether you are a consultant, a doctor, or a small business owner, having a reliable WordPress booking plugin is essential for growth. It allows your clients to see your availability and book appointments in real-time without you ever having to pick up the phone.
In this guide, we will show you exactly how to create booking form WordPress sites that need to stay competitive and organised.
Why You Should Create a Booking Form in WordPress?
Consider all the times you have recently scheduled an appointment. You most likely made reservations online, whether it was for a doctor’s appointment, a quick callback, or a seat at your favourite restaurant.
In actuality, the majority of individuals today anticipate scheduling services without even having to pick up the phone. If your website doesn’t offer a WordPress booking form, you are likely losing out on customers who don’t want to wait for a return call or email.
When you create booking form WordPress systems for your business, you are essentially putting your schedule on autopilot. It acts like a digital receptionist that stays open 24/7, even while you are asleep.
Beyond just convenience, a WordPress appointment booking form helps you stay organised. Instead of managing a messy calendar or a crowded inbox, all your appointments are saved in one central place.
A high-quality WordPress booking plugin can also handle the boring admin work for you. It can automatically send out confirmation emails and reminders to your clients. This professional touch drastically reduces the number of no-shows and forgotten appointments.
If you want to take it a step further, you can even use your WordPress reservation form to collect payments upfront. This is often easier when using the best WordPress payment plugins to ensure that you get paid for your time. It ensures that you get paid for your time and helps filter out people who aren’t serious about their booking.
Ultimately, adding a booking system makes your small business look more established and trustworthy. It shows your visitors that you value their time as much as your own.
Steps to Create a WordPress Booking Form
To help you find the best solution for your site, we have broken this down into clear, manageable stages.
- Step 1: Choosing and Installing the Right WordPress Booking Plugin
- Step 2: Selecting a Template to Create Booking Form WordPress Designs Fast
- Step 3: Customising Your WordPress Appointment Booking Form Fields
- Step 4: Configuring Payments and Notifications for Your WordPress Reservation Form
- Step 5: Adding the WordPress Booking Form to Your Website
Step 1: Choose and Install a WordPress Booking Plugin
The first thing you need to do is choose the right WordPress booking plugin for your website. You should also ensure your site is running on one of the best WordPress hosting providers to handle the automated traffic smoothly.
While there are many options available, you want a tool that is easy to use but powerful enough to handle your specific business needs.
We are using WPForms in this guide. It is one of the most beginner-friendly form builders on the market and is currently used by millions of websites. It allows you to create booking form WordPress designs in minutes using a simple drag-and-drop interface.
More than 1,800 pre-built templates are included with WPForms, including choices made especially for WordPress reservation forms or appointment booking forms. This means that you don’t need to write a single line of code or start from scratch.
If you are just starting out, there is a free version called WPForms Lite that lets you create a basic booking form.
To get started, you will first need to install and activate the plugin. If you have never done this before, you can follow a simple guide on how to install a WordPress plugin.
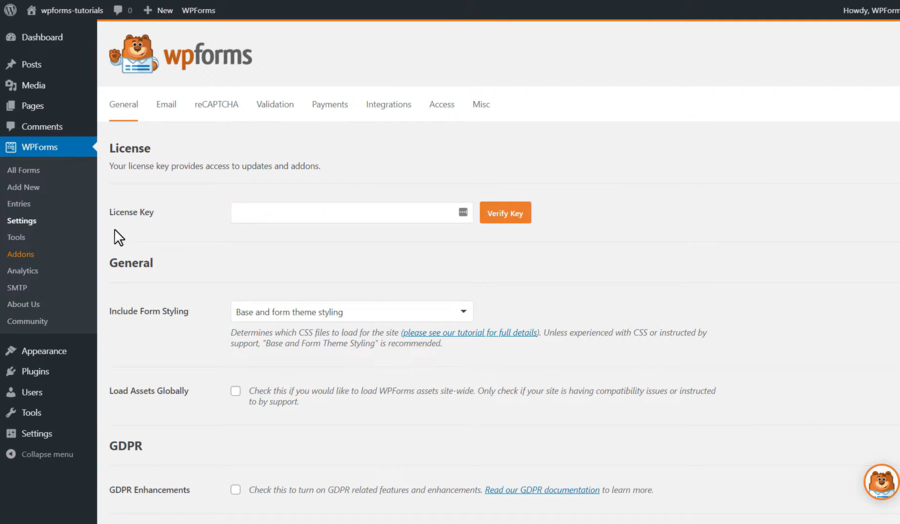
Once the plugin is activated, you need to visit the WPForms » Settings page in your WordPress admin dashboard.
Step 2: Selecting a Template to Create Your Booking Form
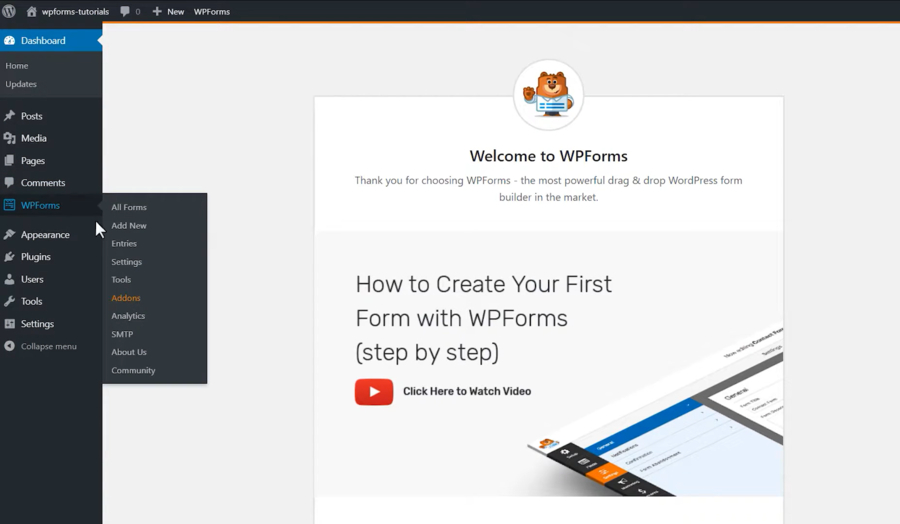
Once the plugin is ready, you need to navigate to WPForms » Add New to start building your form.
At the top of the screen, you will first need to give your form a name.
Next, you will see a library of ready-made templates. WPForms organises these by category to help you find what you need quickly.
Since you want to create booking form that WordPress sites can use for scheduling, you should search for “Booking” or “Appointment”. If you are building a niche site, you might even consider using fast travel WordPress themes that come with built-in styling for these forms.
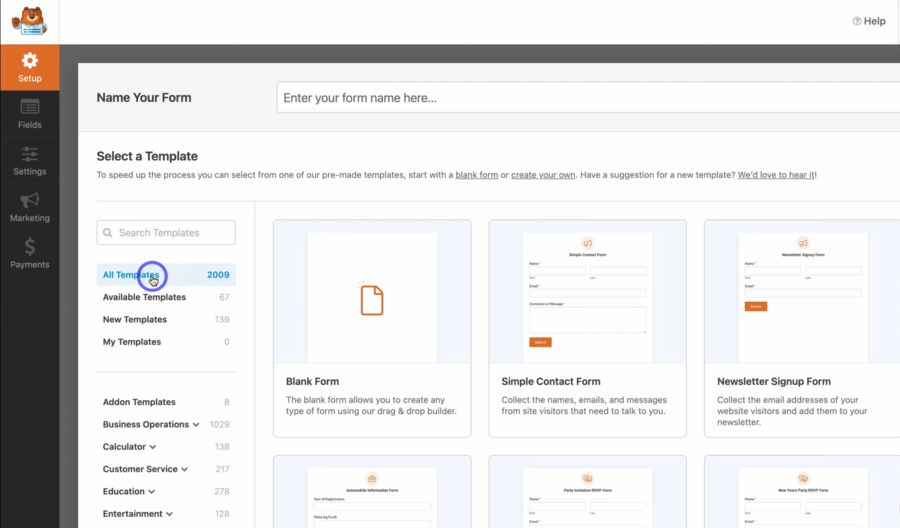
When you hover over a template, you can click the View Demo button to see how it looks. Once you find a design that fits your needs, simply click on the Use Template button.
This will launch the WPForms drag-and-drop builder, where you can turn a generic template into a custom WordPress booking form that matches your business perfectly.
Step 3: Customising Your WordPress Appointment Booking Form
You can choose the Blank Form for the beginning. Now that the builder is open, you will see a live preview of your form on the right and a list of available fields on the left.
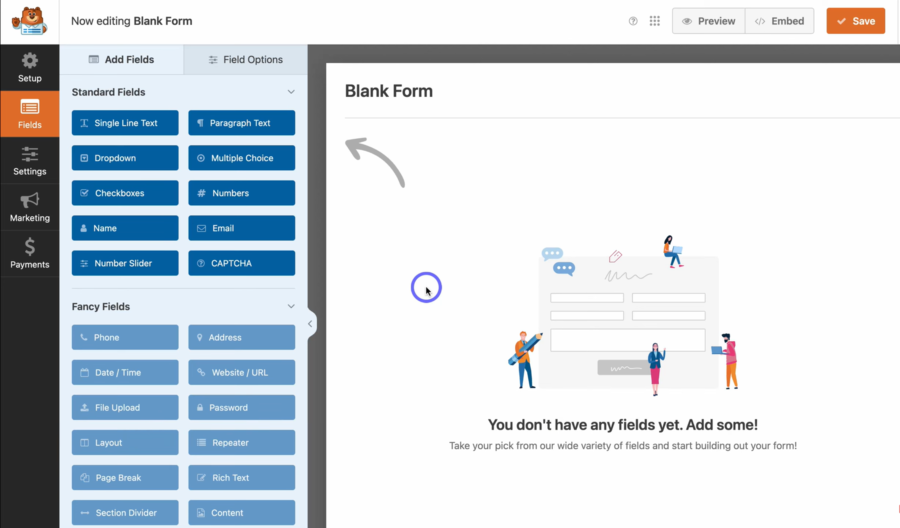
The default template includes standard fields like Name, Email, and Phone. However, for a high-quality WordPress appointment booking form, you will want to add a Date/Time field so customers can pick their slot.
To add a new field, you simply drag it from the left-hand column and drop it wherever you want it to appear on your form.
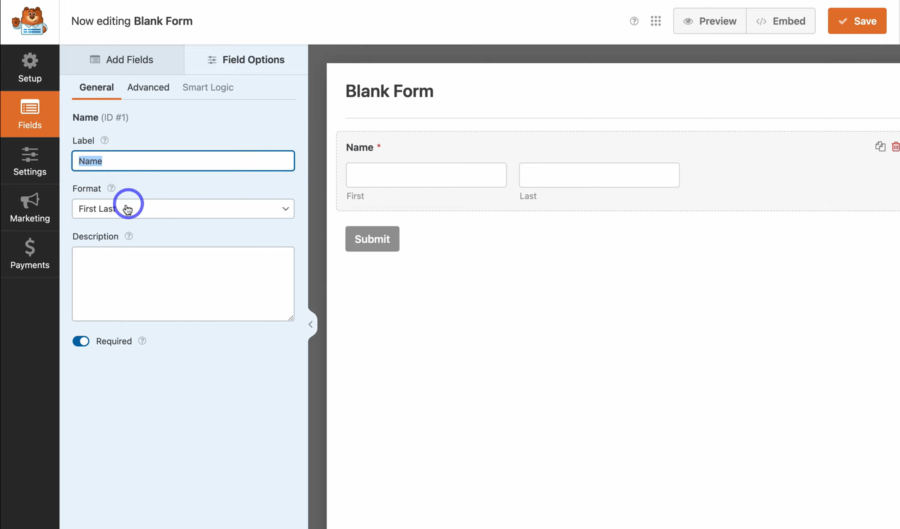
If you want to edit an existing field, just click on it. The left sidebar will then change to show you the Field Options. Here, you can change the label, format, or add a description to help your visitors.
For a WordPress reservation form, we highly recommend making the Date and Time fields “Required.” This ensures that you never receive a submission without the most important information.
You can also use “Dropdown” or “Multiple Choice” fields if you want clients to select a specific service or staff member. This keeps your WordPress booking form organised and helps you prepare for the appointment ahead of time. This level of professional scheduling is a key feature found on the best online travel agent platforms.
Once you are happy with how your form looks, don’t forget to click the Save button in the top right corner.
Step 4: Configuring Notifications and Payments
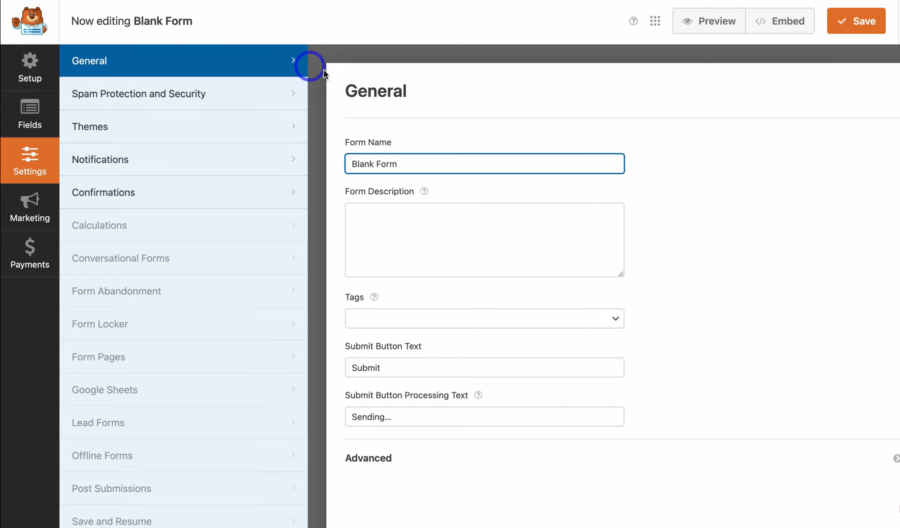
After you finish customising your WordPress booking form, you need to make sure that you actually get notified when a client schedules an appointment. This is done in the Settings tab inside the WPForms builder.
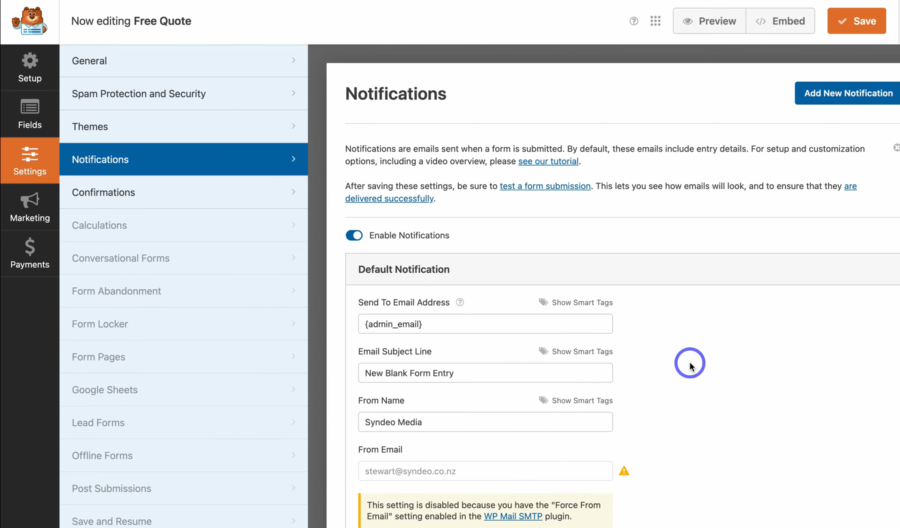
First, click on Notifications. By default, WPForms is set up to send an email to your WordPress admin email whenever someone completes your WordPress appointment booking form. If you have a business partner or a receptionist who handles your schedule, you can easily add their email addresses here as well.
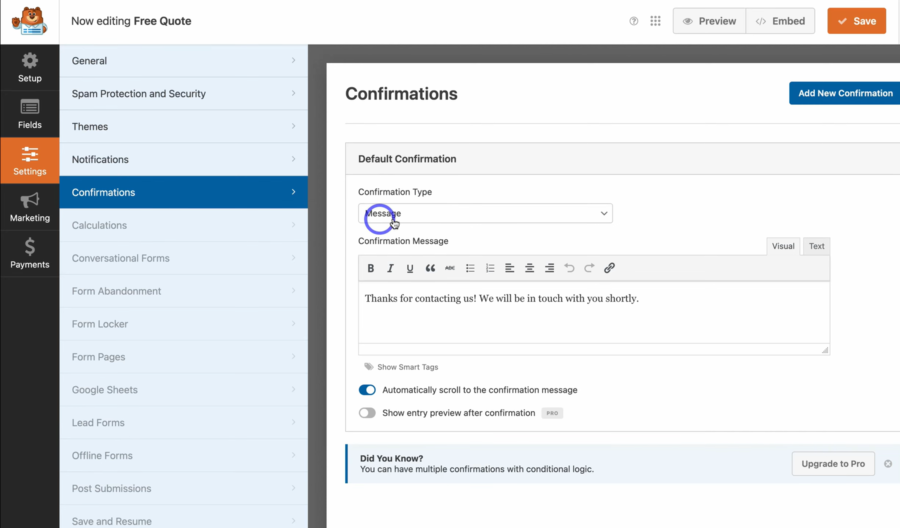
Next, you should check the Confirmations settings. This is the message your visitors will see immediately after they submit your WordPress reservation form. You can show a simple “Thank You” message or even redirect them to a specific page on your site with more instructions for their appointment.
If you are using a professional WordPress booking plugin to collect deposits or fees, you will also need to visit the Payments tab. From here, you can connect your form to Stripe, PayPal, or Square. This ensures that when a customer uses your WordPress booking form, the payment is processed securely and instantly.
Once you have finished configuring these settings, make sure to click the Save button at the top of the screen.
Step 5: Publishing Your Booking Form on Your Website
Now that your form is ready and your settings are saved, you need to put it on your website. WPForms makes it incredibly easy to add your WordPress booking form to any post or page without touching a single line of code.
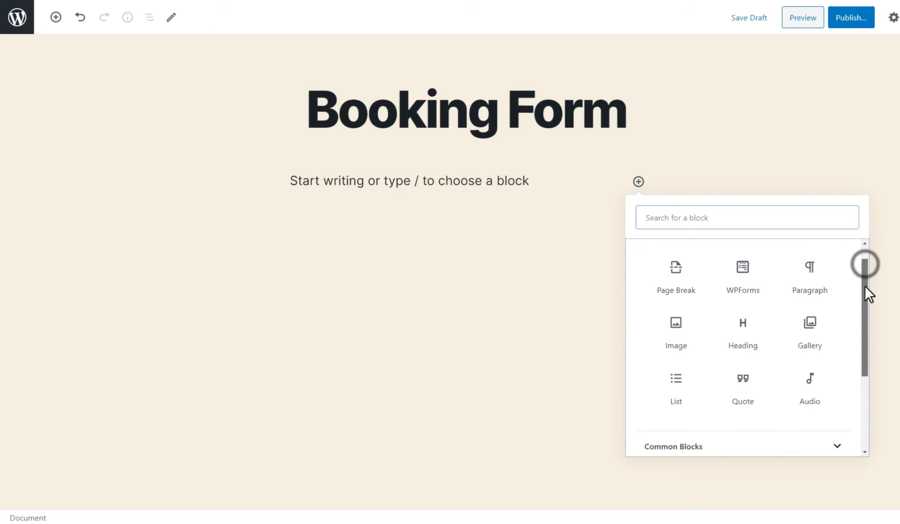
First, you need to create a new page or edit an existing one where you want the booking system to appear. In the WordPress block editor, simply click on the (+) plus icon to add a new block.
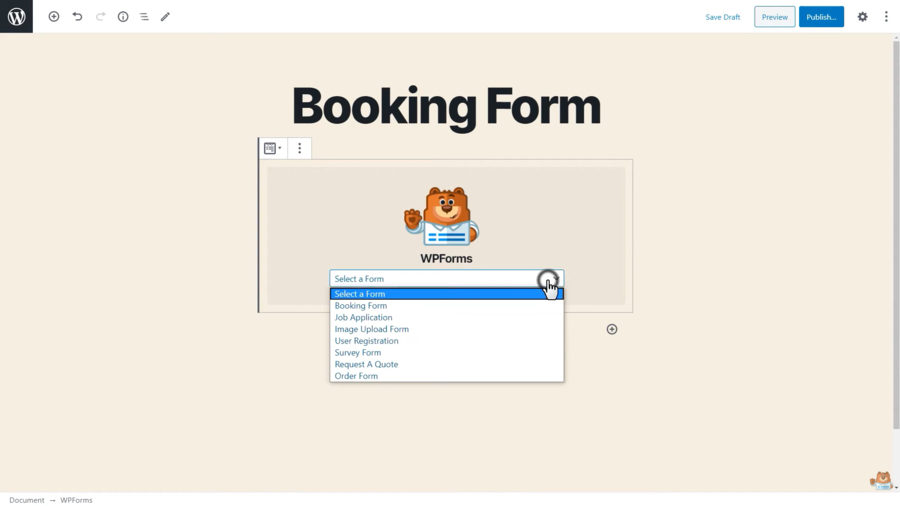
Search for “WPForms” and click on the block to add it to your page. You will then see a dropdown menu where you can select the specific WordPress appointment booking form you just created.
If you are happy with how it looks, go ahead and click the Publish or Update button at the top right of your screen.
That’s it! You have successfully learned how to create booking form WordPress users can use to schedule their own appointments. You can now visit your live website to see your new WordPress reservation form in action. If you want your site to look even better, check out our list of the best responsive travel WordPress themes to ensure a mobile-friendly experience.
FAQs About WordPress Booking Forms
What is the best WordPress booking plugin for beginners?
For most users, we recommend WPForms or Sugar Calendar. WPForms is incredibly easy to use if you need a simple WordPress booking form, while dedicated plugins like Amelia or BirchPress offer more complex scheduling features.
Can I accept payments through my WordPress reservation form?
Yes! Most top-tier plugins allow you to connect with Stripe, PayPal, or Authorize.net so you can charge clients during the booking process.
Will a WordPress appointment booking form work on mobile devices?
Absolutely. If you use a high-quality plugin, your WordPress booking form will be fully responsive, meaning it will look and work perfectly on smartphones, tablets, and desktops.
Conclusion
Setting up a WordPress booking form is one of the smartest moves you can make for your digital presence. It saves you hours of manual work every week and gives your clients the convenience they expect nowadays.
By choosing the right WordPress booking plugin and following a few simple steps, you can transform your website from a simple brochure into a powerful machine.
Read more: How to Make a Travel Website with WordPress (Step-by-Step Guide)
You may also like
How to Install a WordPress Plugin: A Complete Beginner Guide
Posted on January 20, 2026WordPress is powerful because it can be customized endlessly, and plugins are the reason why. If you are new to the platform, one of the first things you need to learn is how to install a WordPress plugin correctly.
Plugins allow you to add new features to your site without touching

How to Add a Weather Widget to WordPress for Travel & Hotel Websites
Posted on January 5, 2026If you manage a WordPress website for a bed & breakfast, a local tour operator, or an outdoor event venue, your visitors all share one specific anxiety: “What is the weather going to be like?”
It is a critical factor in travel planning. If a user has to leave your site