How to Setup a WordPress Appointment Booking System

Managing your schedule through endless back-and-forth emails or phone calls is a recipe for burnout. If you are still manually entering dates into a spreadsheet, you are likely losing leads to competitors who offer a smoother, instant experience.
The good news is that you don’t need to hire a developer to build a professional scheduling tool. By using a robust WordPress appointment booking system, you can automate the entire process, from the first click to the final payment.
In this guide, I will show you how to make a travel website with WordPress or any service site by building a booking system that automates scheduling, payments, and reminders step by step. When completing this guide, everything can be done automatically.
Why You Should Use a WordPress Appointment Booking System Plugin
If you are serious about growing your service-based business, a manual calendar is your biggest bottleneck. Transitioning to a dedicated WordPress booking plugin offers four transformative advantages, especially if you are using the best hotel WordPress themes with beautiful designs to showcase your rooms.
:
1. 24/7 Availability Without the Effort
Your customers don’t always shop for services during 9-to-5 business hours. An appointment booking WordPress solution allows potential clients to book a slot at midnight while you are asleep. It turns your website into a tireless receptionist that never takes a day off.
2. Drastic Reduction in No-Shows
Manual scheduling often leads to forgotten appointments. A professional WordPress scheduling system includes automated email and SMS notifications. By sending a reminder hours before the meeting, you significantly increase the chances of the client showing up on time.
3. Secure Upfront Payments
Chasing invoices is exhausting. With an online booking system WordPress, you can require a deposit or full payment at the moment of booking. Integrating gateways like Stripe or PayPal ensures the revenue is secured before you even open your laptop, similar to how LearnPress payment add-ons review highlights the ease of managing course transactions.
4. Professional Brand Authority
Sending a client a polished booking link looks much more professional than asking, “What time works for you?” It shows that you value your time and have a streamlined operation, which builds immediate trust with high-value clients.
General Steps to Set Up Your Booking System
Setting up a WordPress appointment booking system is straightforward. Here is the overview of the roadmap we will follow:
- Step 1: Installing and Activating the FluentBooking Plugin
- Step 2: Connecting Your Personal Calendars (Google/Outlook Sync)
- Step 3: Creating Your First Event Type (Consultations, Services, etc.)
- Step 4: Configuring Your Availability and Time Slots
- Step 5: Setting Up Automated Email Notifications and Reminders
- Step 6: Integrating Payment Gateways for Paid Appointments
- Step 7: Embedding the Booking Calendar on Your Website Pages
Step 1: Installing and Activating the Plugin
To begin building your WordPress appointment booking system, you first need to iTo begin building your WordPress appointment booking system, you first need to install the necessary software. If you are in the tourism niche, you might also want to learn how to add a WordPress hotel booking system for property-specific features.
Some of the plugins offer a streamlined experience that doesn’t bloat your database, making them a refined choice.
I will use FluentBooking to create an online booking system WordPress setup as an example, or you can choose any similar tool.
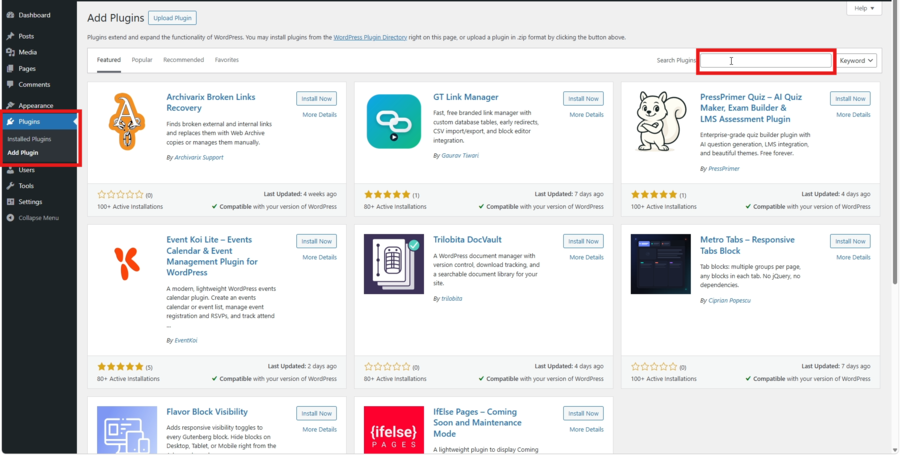
First, log in to your WordPress admin area and navigate to Plugins » Add New. In the search bar at the top right, type “FluentBooking.” Once the plugin appears in the results, click the Install Now button.
After the installation finishes, the button will change to Activate. Click it to enable the WordPress booking plugin on your site. You will now see a new “FluentBooking” menu item in your left-hand sidebar. Click this to open the setup wizard, which will guide you through the initial configuration, such as setting your time zone and primary business email.
Step 2: Connecting Your Personal Calendars
One of the most critical parts of an appointment booking WordPress setup is ensuring you never get double-booked. FluentBooking handles this by syncing directly with the calendars you already use daily.
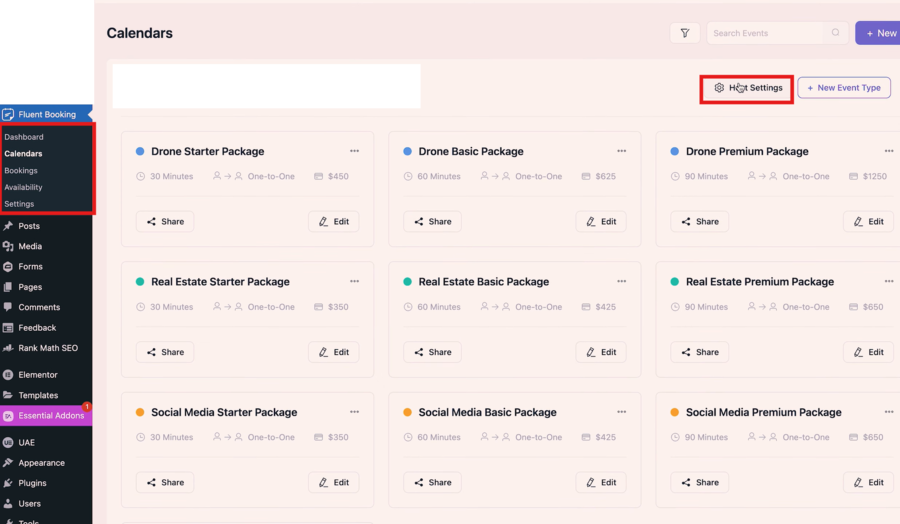
To set this up, go to FluentBooking » Settings, select the Calendars tab and then choose Host Setting. From here, you can choose your preferred provider.
Syncing with Google Calendar
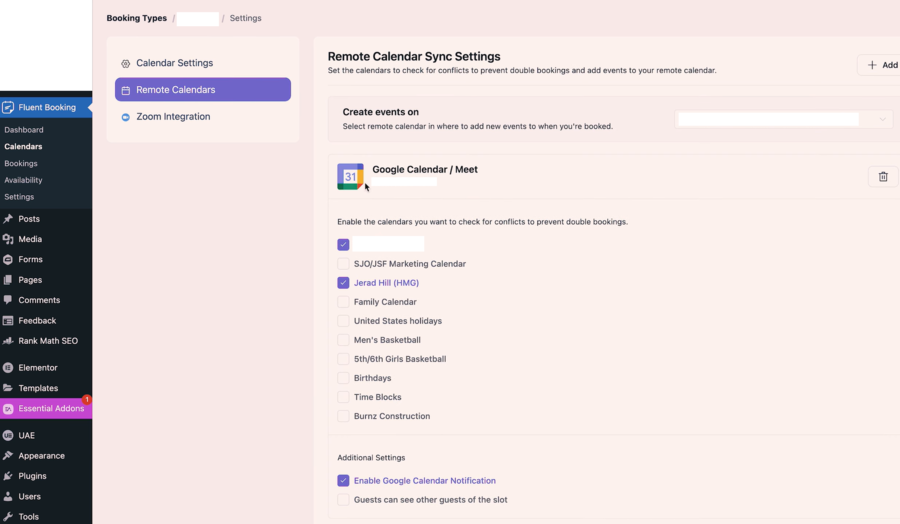
Click on the Connect Google Calendar button. You will be redirected to a Google authorisation screen. Select the account you use for your business and grant the necessary permissions. Once confirmed, you will be sent back to your WordPress dashboard.
Step 3: Creating Your First Event Type
Now that your calendar is synced, it’s time to define what services you are offering. In FluentBooking, these are called Event Types; This is where you build the foundation of your WordPress appointment booking system, which is a vital component for those using the best WordPress themes for cafes to manage table reservations.
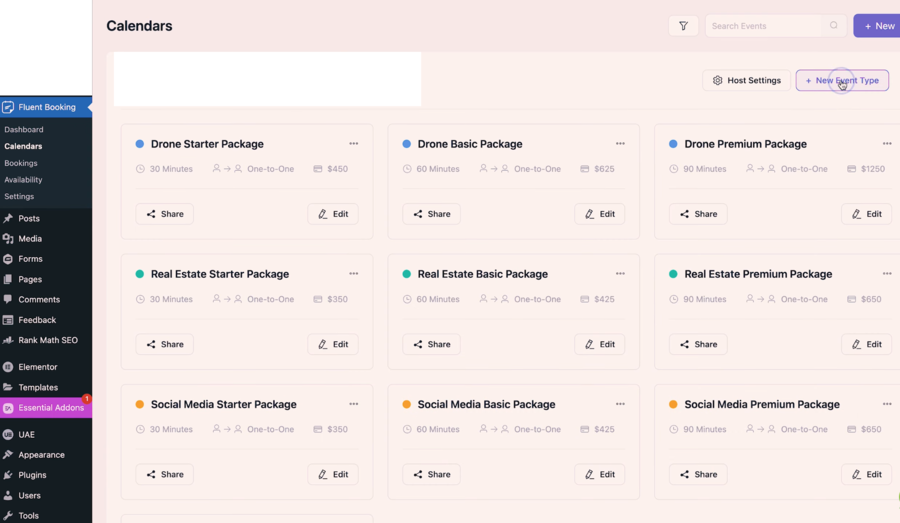
To get started, navigate to FluentBooking » Calendars and click the New Event Type button. You will typically choose the “One-on-One” option for standard consultations.
Defining Your Service Details
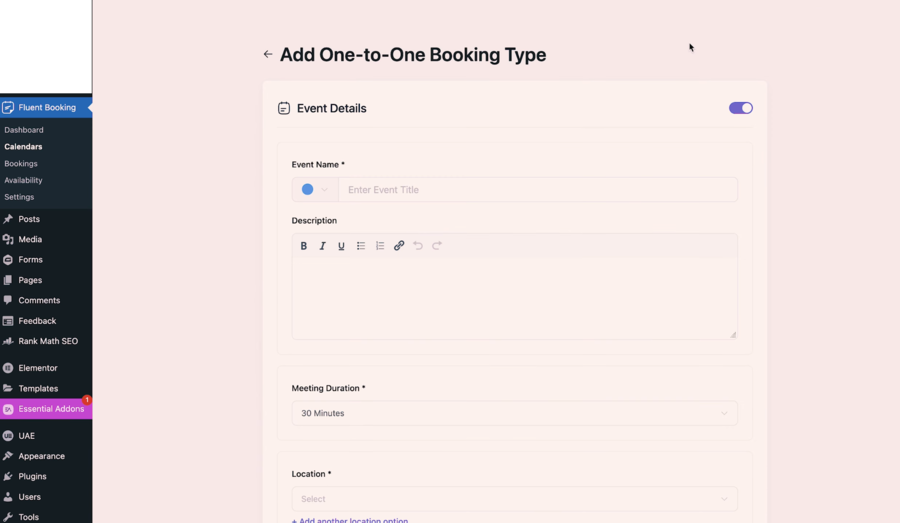
Once inside the event editor, fill out the following key fields:
- Event Name: Choose a clear, benefit-driven title like “SEO Strategy Consultation.”
- Duration: Set the exact length of the meeting. This tells the WordPress scheduling system how much time to block off.
- Location: You can select “Google Meet” or “Zoom” if you’ve connected your integrations, or choose “Physical Location” for in-person meetings.
- Description: Briefly explain what the client will get out of the session.
I recommend keeping the description literal and focused on the technical outcomes of the meeting to ensure your appointment booking WordPress flow remains professional and clear.
Step 4: Configuring Your Availability and Time Slots
One of the most powerful features of an online booking system WordPress setup is the ability to protect your personal time. You don’t want clients booking meetings during your focused deep-work hours or late at night.
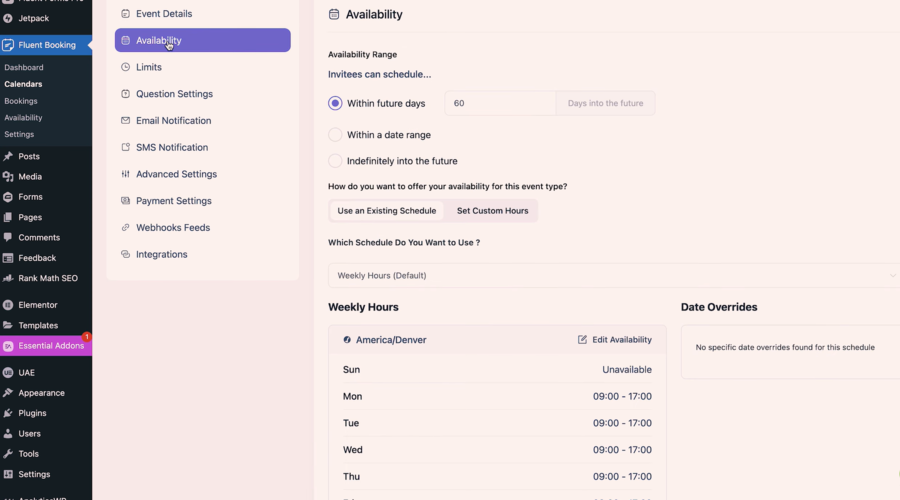
In the event editor, click on the Availability tab. Here, you can define exactly when you are open for business.
Setting Your Weekly Schedule
You can set an existing schedule or create a custom one for this specific service. Simply toggle the days of the week you are available and set your start and end times (e.g., 9:00 AM to 5:00 PM).
Adding Buffers and Lead Times
To prevent back-to-back burnout, you can also set a limit on the appointment
- Buffer Time: Add 10-15 minutes before and after each meeting. This gives you time to take notes or grab a coffee without the next client waiting.
- Minimum Notice (Lead Time): Set this to at least 12 or 24 hours. This prevents surprise meetings from appearing on your calendar just minutes before they are supposed to start.
By fine-tuning these settings, your WordPress booking plugin acts as a strict gatekeeper, ensuring you only take meetings when you are truly prepared.
Step 5: Setting Up Automated Email Notifications and Reminders
Once your events are live, the next priority is ensuring both you and your clients are kept in the loop. A high-performing WordPress appointment booking system should handle all communication automatically so you don’t have to send manual “See you tomorrow” emails.
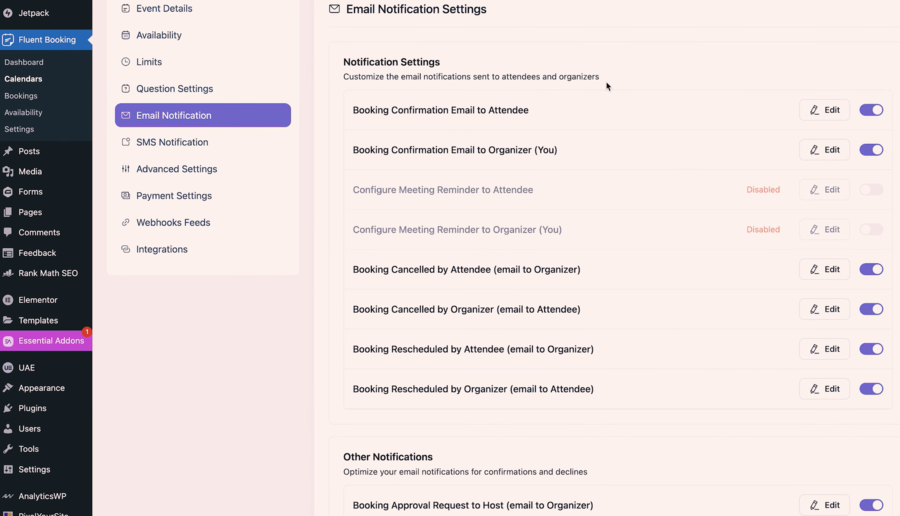
In your event editor, navigate to the Email Notifications tab. By default, FluentBooking has several templates ready to go:
- Booking Confirmation: Sent immediately after a client selects a slot. I recommend customising this to include a link to your “Preparation Guide” or a brief thank-you note.
- Appointment Reminders: This is the most effective way to reduce no-shows. You can set multiple reminders.
- Cancellation/Reschedule Emails: These ensure that if a meeting is moved, everyone’s WordPress scheduling system is updated instantly without confusion.
Once you are happy with the setting, we can move on to the next section.
Step 6: Integrating Payment Gateways for Paid Appointments
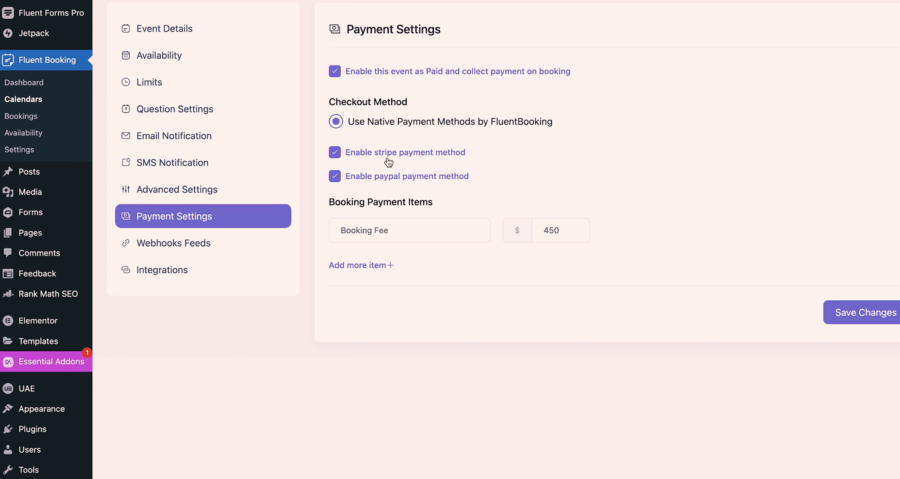
If you offer paid consultations, collecting fees upfront is a non-negotiable step. Integrating a payment gateway into your online booking system WordPress setup can secure your revenue.
- Connect Your Account: Go to FluentBooking » Settings » Payments. Here, you can connect your Stripe or PayPal account. I recommend Stripe for its “Embedded Checkout,” which keeps users on your site rather than redirecting them away.
- Enable Payment for Events: Go back to your specific Event Type and click the Payment tab.
- Set Your Price: enter your price, and choose your currency for the booking event.
By requiring payment during the appointment booking WordPress process, you ensure that every slot on your calendar is backed by a committed client. This simple barrier to entry is the best way to protect your billable hours.
Step 7: Embedding the Booking Calendar on Your Website
The final step in your WordPress appointment booking system setup is making it visible to your audience. FluentBooking makes this incredibly easy regardless of which page builder you use, making it a perfect fit for the best seo friendly travel WordPress themes currently on the market.
Using the Gutenberg Block
If you use the standard WordPress editor, simply click the (+) icon to add a new block and search for “FluentBooking.” Select the FluentBooking Event block, then pick your specific consultation from the dropdown menu. You will see a live preview of the calendar immediately.
Using Shortcodes
For those using Elementor, Divi, or Beaver Builder, you can use a shortcode. Navigate to FluentBooking » Calendars, copy the shortcode and paste it into a “Shortcode” or “Text” widget on your booking page.
Pro-Tip: Before you publish the page, open it on your mobile phone. A dedicated online booking system WordPress must be easy to navigate on small screens. Ensure the time slots are easy to tap and the “Confirm” button isn’t hidden by any footer elements.
That’s the complete guide for you to build a booking system in WordPress! Your complete booking system with payments and automated reminders is now live on your WordPress site.
FAQ: WordPress Appointment Booking Systems
Does WordPress have a built-in scheduling tool?
No, WordPress does not include a native tool for appointments. You must install a WordPress booking plugin to add this functionality to your dashboard.
Can I sync my booking system with my Google Calendar?
Yes. A high-quality appointment booking WordPress tool will offer two-way sync. This means when you add a personal event to your Google Calendar, those slots are automatically blocked on your website to prevent double-booking.
How do I prevent fake or spam bookings?
You can enable features like email verification, reCAPTCHA, or require a mandatory payment/deposit. These hurdles ensure that only serious clients can occupy space on your professional calendar.
Conclusion
Building a WordPress appointment booking system is a necessity for any modern business. By moving away from manual coordination and adopting an automated WordPress booking plugin, you reclaim your time and provide a superior experience for your clients.
Whether you are a solo consultant or managing a large team, an online booking system WordPress setup like FluentBooking provides the flexibility and professional polish needed to scale. Once you have your appointment booking WordPress flow live, you’ll wonder how you ever managed your business without it.
Read more: How to Create a Restaurant Website with WordPress: A Complete Guide
You may also like

How to Build a Multi-Currency Travel Booking Website for Global Audiences
Posted on June 11, 2026If you have ever managed an international travel agency, boutique tour company, or hotel distribution engine on WordPress, you already know that wanderlust has no borders. Travellers from London, New York, and Tokyo are constantly searching for their next escape. However, the moment an international explorer encounters a checkout page displaying foreign currencies, friction
How to Add Google Maps to Your Travel WordPress Website
Posted on June 3, 2026Imagine reading a thrilling travel blog about a hidden beach in Bali or a cosy cafe in Paris. You are hooked, inspired, and ready to pack your bags. But then, you look for the exact location, and all you see is a vague text description. Frustrating, right?
As a travel content