When planning a vacation, a weekend getaway, or a guided tour, travellers naturally want reassurance from real people who have already spent their hard-earned money on those experiences. Because they cannot physically test your travel services before purchasing, they look for visual indicators of safety, quality, and reliability. Adding genuine feedback directly onto your site helps build that crucial foundation of trust right where your bookings happen, turning casual lookers into confident bookers.
While managing a website can sometimes feel complicated, you do not need to be a professional web developer to build a trustworthy platform. By using a specialised customer review plugin WordPress tool, you can easily gather and display authentic feedback. In this comprehensive guide, you will discover exactly how to add customer reviews to travel website setups efficiently by learning how to make a travel website with WordPress, helping you boost your credibility and streamline your reservation process.
Why You Should Add Customer Reviews to a Travel Website
When potential travellers visit your platform, they are not just buying a ticket or reserving a room—they are investing in a future experience. Knowing how to add customer reviews to travel website platforms and incorporating travel website customer reviews into your digital strategy offers several undeniable advantages for your business growth, especially if your goal is to build a multi-currency travel booking website for global audiences.:
Help Travellers Make Decisions Faster
Planning a trip can feel overwhelming. Travellers often spend hours browsing different open tabs, comparing prices, and worrying if a tour or accommodation will live up to the beautiful pictures. When you add reviews to WordPress website layouts, you provide the answers they need directly on your page. Reading about another family’s successful vacation or a solo traveller’s smooth experience removes hesitation, helping visitors make up their minds much faster.
Maximise Your Booking Conversion Rates
Social proof is a powerful psychological tool. When a user sees that dozens of other people have successfully booked and enjoyed a specific travel package, the fear of making a mistake disappears. Clear, visible travel booking testimonials act as quiet, highly effective sales representatives that work for your business every minute of the day, directly leading to an increase in completed reservations.
Boost Your Visibility in Search Engine Results
Search engines love fresh, original content. When your past guests write detailed descriptions of their experiences—mentioning specific locations, local tour guides, or hotel amenities—they are naturally adding valuable words to your pages. This user-generated content helps search engines understand your services better, making your platform more likely to rank higher when other consumers look for travel experiences online.
Step-by-Step Guide to Implementing Customer Reviews
Setting up a robust feedback loop on your website does not have to be an intimidating task. By using a specialised, lightweight tool, you can host everything directly inside your own system database. This grants you complete privacy and data control without requiring a subscription to a costly external service. To help you get the system up and running, we have broken down the setup sequence into clear, logical milestones.
Step 1: Navigate to Your Website’s Plugin Marketplace
The first part of the process involves accessing your website’s back-end digital workshop, where all modifications, structural adjustments, and tool integrations take place before they are launched for public viewing. Start by opening a new window in your web browser and typing your website’s unique administration login address. Input your administrative credentials to load the primary website management board.
Once the screen populates, turn your attention to the dark vertical menu running along the left side of the interface, which serves as your main navigation anchor. Move your pointer down the selection options until you locate the one titled Plugins. When you hover over or click this option, a contextual sub-menu will unfold. From this menu, select the action labeled Add New Plugin (or simply Add New, depending on your specific version setup). This command shifts your viewport away from the general dashboard landing and drops you directly into the main, integrated directory where all verified additional website tools are hosted and catalogued.
Choosing a lightweight customer review plugin WordPress is always ideal because it protects your page load times, which is highly dependent on whether you choose a free vs premium travel WordPress theme for your foundational design. Keeping your website fast is critical, especially since travellers frequently book trips using their mobile phones. The tool recommended in this guide is designed to be lightweight, meaning it stores information directly within your database efficiently without relying on heavy external files that could cause your pages to lag.
Pro-Tip for System Safety: Before introducing new code components to an active business platform, always check that your central system software is updated to its latest stable release version. This simple precautionary check prevents technical compatibility friction, ensures security protocols match, and keeps all background features running smoothly alongside your core booking forms.
Step 2: Search, Install, and Activate Your Review Tool
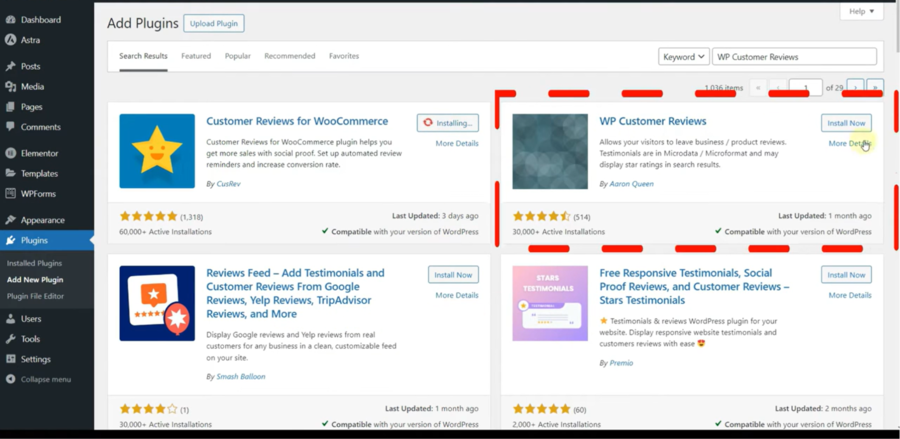
With the marketplace dashboard loaded, your next phase is to sort through the technical repository, isolate the tool files, and systematically integrate them into your website backend. In the top right quadrant of the screen, you will notice a prominent, empty search box containing the placeholder text “Search plugins…”. Click inside this search box and type a broad term like “‘travel website customer reviews” or use a specific example such as WP Customer Reviews if you are following our recommended setup. The system will automatically scan its database, refreshing your interface to reveal a grid layout filled with matching software choices.
Locate the primary tile that matches your preferred choice. You can easily verify that you have found a reliable option by looking at the developer credentials, reading user feedback, and confirming that it has a strong history of regular updates. Once verified, find the clear installation button located inside the details tile and click it once to trigger the background download process. The button text will change momentarily to indicate the system is actively fetching the necessary code blocks. As soon as the system finishes downloading the files, a clear button option will appear displaying the word Activate. Click this button a final time to turn the engine on and integrate the fresh components directly into your active runtime environment.
When you add reviews to WordPress website layouts, you provide the answers they need directly on your page. Reading about another family’s successful vacation or a solo traveler’s smooth experience removes hesitation, helping visitors make up their minds much faster. Utilizing a dedicated customer review plugin WordPress option keeps the technical setup straightforward, allowing you to focus on creating great itineraries rather than dealing with complex website code.
Step 3: Configure Your Global Review Settings and Moderation Rules
Before displaying any submission forms to your visitors, you must establish the background operational parameters. This configuration phase ensures that incoming feedback is correctly filtered and aligns with the structural goals of your booking platform.
To access the configuration panel, click on the newly created review menu link in your sidebar. Navigate to the settings tab to establish your foundational workflow using these configurations:
Locate the Moderation / Approval toggle and set it to Enabled. This ensures that no customer feedback goes live on your travel pages without your direct administrative signature, protecting your platform from spam or unverified entries.
Find the Review Type configuration dropdown to safely add reviews to WordPress website listings.
Check the box labeled Require Names and Email Addresses to ensure that anonymous users cannot leave blank or untraceable ratings on your booking pages.
Navigate to the Success Message Text input field and type a friendly confirmation phrase for your travel booking testimonials.
Most high-quality tools feature an integrated captcha or hidden validation field within the setup settings. Always toggle this option to On. This adds a layer of automated protection that blocks automated bot scripts from flooding your moderation queue with fake travel booking testimonials, saving you hours of administrative cleaning work later. This phase ensures that incoming travel website customer reviews are correctly filtered and aligns with the structural goals of your travel booking testimonials platform.
Step 4: Customise Your Form Fields and Rating Displays
Once your underlying moderation rules are firmly in place, you need to design the interface that your travellers will interact with. Tailoring the input fields ensures you gather specific information that helps future vacationers make fast booking decisions.
Look for the visual or fields tab inside your plugin dashboard. This section allows you to control the exact layout elements, star parameters, and text boxes that appear on your live pages:
Scroll to the fields management layout and check the boxes next to Star Rating and Review Title to make them mandatory entry points.
To add tailored tracking data, click on the Add Custom Field button, name the field label Tour Date, and set the input format type to Date.
Create a second custom field by clicking Add Custom Field and choosing a dropdown selection format containing choices.
Find the layout styling section and select a Grid layout if you want to display multiple cards side-by-side on a wide homepage, or choose a List / Carousel structure to keep your individual tour pages looking clean and uncluttered. This visual control layout is often simpler depending on your builder choice, such as comparing Gutenberg vs Elementor for travel blogs.
When you look at different review layout variations, always keep mobile viewports in mind. A complex multi-column design might look excellent on a wide desktop screen, but can quickly become crowded or difficult to read for a traveller attempting to browse your itineraries on a smartphone. Keeping your fields concise and your text boxes spacious ensures a smooth user experience across all devices.
Step 5: Activate and Embed the Review Form on Travel Pages
The final technical step is to connect your configured review system directly to your public-facing layout. This places the submission form and the star ratings exactly where users make their final tour and activity purchases.
Depending on the specific tool you selected, you will deploy the software using either an automated page-level toggle block or a manual snippet of shortcode text:
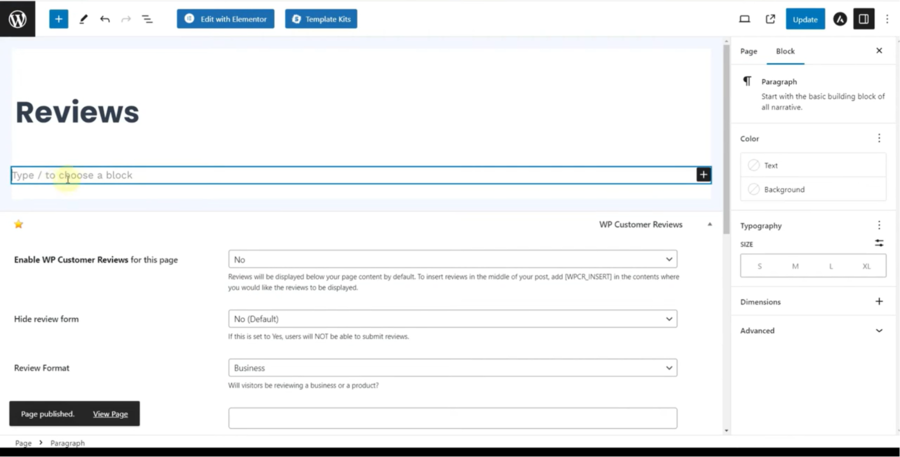
If your tool utilises a page-level integration toggle, navigate to your sidebar, click on Pages or Tours, and open the specific listing editor for the trip you want to modify.
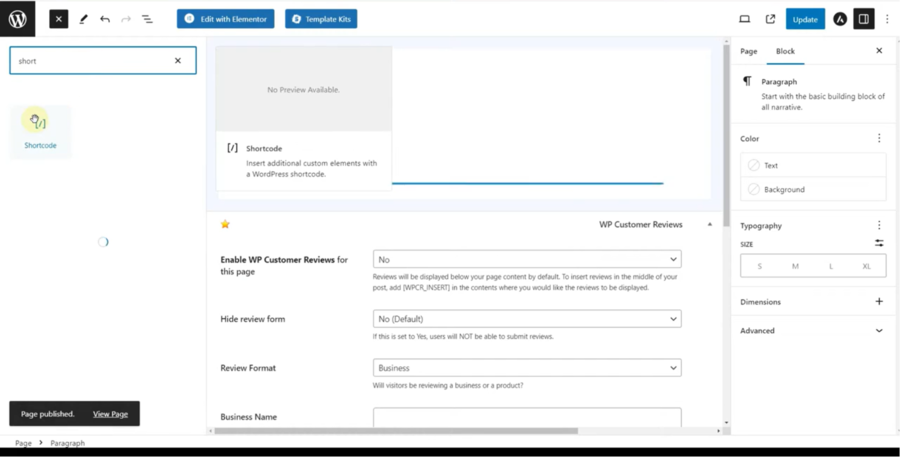
If your tool relies on manual shortcodes, go to your review settings dashboard, highlight the text code block and select Copy.
Return to your target tour page, insert a Shortcode Block or a Custom HTML Block right beneath your booking button, right-click inside the blank text window, and select Paste. Click the blue Update or Publish button at the top right of your screen to publish the changes.
After saving your page modifications, log out of your administration area or open a completely separate private browsing window to view the live webpage. Check the very bottom of the tour listing to confirm that the star graphic boxes, the input fields, and the submission buttons display perfectly within your current design layout without overlapping your primary booking buttons.
Frequently Asked Questions (FAQs)
Can I choose which comments appear on my travel booking pages?
Yes. The plugin features a built-in moderation system. This means that whenever a traveller submits travel website customer reviews, it does not go live immediately. It sits safely in your administration dashboard, allowing you to read it, verify its authenticity, and choose whether to approve or reject it before it becomes visible to the public.
Will adding a review tool slow down my website’s loading speeds?
Keeping your website fast is critical, especially since travellers frequently book trips using their mobile phones. The tool recommended in this guide is designed to be lightweight, meaning it stores information directly within your database efficiently without relying on heavy external files that could cause your pages to lag.
Should I display negative feedback on my travel platform?
While it might seem tempting to only show perfect ratings, having a few imperfect scores actually makes your website look more authentic. A profile filled exclusively with 5-star ratings can sometimes make modern consumers suspicious. The key is how you respond to negative comments. Handling a complaint professionally and showing that you care about fixing issues can actually boost your credibility.
Conclusion
Building a successful travel brand relies heavily on transparency and trust. By learning how to add customer reviews to a travel website, you provide a space where past adventurers can share their stories, helping future clients feel secure in their decisions. Utilising a dedicated customer review plugin WordPress option keeps the technical setup straightforward, allowing you to focus on creating great itineraries rather than dealing with complex website code.
When you make real travel booking testimonials a clear part of your presentation and know how to add customer reviews to travel website pages, you bridge the gap between curiosity and a finalized booking. Take the time to set up your feedback system today, encourage your past guests to share their honest memories, and watch your travel platform grow.
If you have ever managed an international travel agency, boutique tour company, or hotel distribution engine on WordPress, you already know that wanderlust has no borders. Travellers from London, New York, and Tokyo are constantly searching for their next escape. However, the moment an international explorer encounters a checkout page displaying foreign currencies, friction
Imagine reading a thrilling travel blog about a hidden beach in Bali or a cosy cafe in Paris. You are hooked, inspired, and ready to pack your bags. But then, you look for the exact location, and all you see is a vague text description. Frustrating, right?